How to Grow Tomato Plants in Hanging Plastic Bottles: Step-by-Step Guide from Seed to Harvest
If you’ve ever dreamed of growing your own juicy tomatoes but thought you didn’t have the space, we’ve got good news — you don’t need a garden. You don’t even need pots. Just a few plastic bottles, some twine, and a sunny balcony or window. This clever vertical gardening method lets you turn everyday waste into a thriving tomato plant, right from seed.
Whether you live in an apartment, a house with no yard, or you just want a cleaner, more sustainable way to garden, this method is perfect for you. Ready to grow your own hanging tomato paradise? Here’s how.
What You’ll Need:
- Empty plastic bottles (1.5L or 2L work best)
- Tomato seeds (cherry tomatoes or small varieties are ideal)
- Potting soil or nutrient-rich compost
- Sharp knife or sturdy scissors
- Drill or hot nail (to make holes)
- Strong twine, rope, or wire
- Watering can or spray bottle
- Organic fertilizer (optional, but recommended)
- Mulch (like coconut husk or dry leaves)
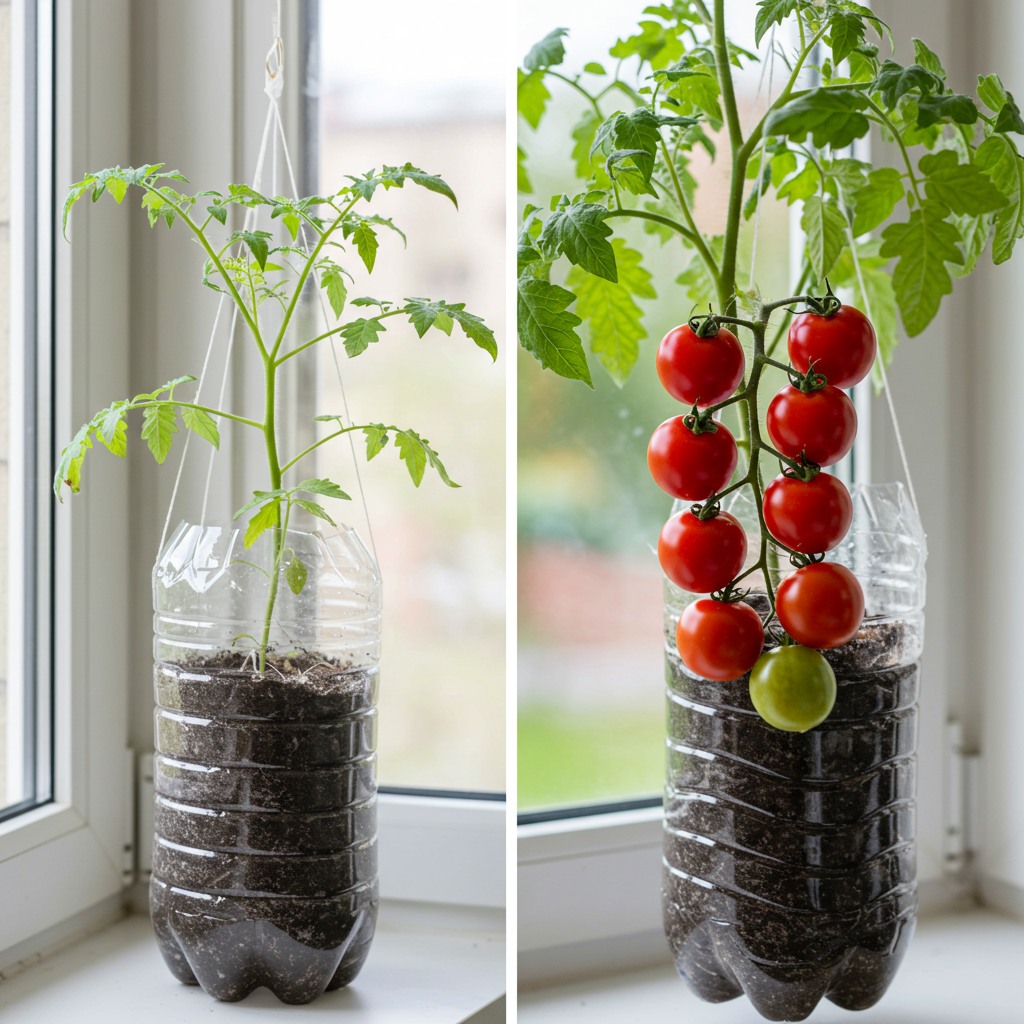
Step 1: Prepare the Bottles
Start with clean, dry plastic bottles. Remove any labels so sunlight can reach the plant from all directions.
Use a knife or scissors to cut an opening about 4–5 inches long and 2–3 inches wide on one side. This will be the main planting space.
Drill or melt a few small holes in the bottom of the bottle for drainage — essential for avoiding soggy roots. Then, make two small holes near the bottle’s neck (on opposite sides) to tie your rope or wire for hanging later.
Step 2: Mix the Right Soil
The secret to healthy tomatoes starts with the right soil. Use a high-quality potting mix with compost for nutrients. You can also mix in vermicompost or well-rotted manure for a natural nutrient boost.
“The soil should feel light, drain well, and still hold some moisture,” recommends organic gardening expert Sara Boone. “It’s better to avoid heavy clay-like soil that can suffocate young roots.”
Step 3: Plant the Seeds
Lightly moisten your soil before planting.
Sow 2–3 tomato seeds in each bottle, about half an inch deep. Cover gently with soil and press down slightly. Tomatoes germinate best in warm spots — aim for a temperature of 21–27°C (70–80°F). Keep the bottle in a sunny window or outside if it’s warm enough.
Tomato seeds generally sprout within 7–14 days. During this time, ensure the soil stays consistently moist but never soggy.
Step 4: Hang It Up
Once your seedlings are about 2 inches tall, you can hang your bottle garden. Run twine or wire through the holes you made earlier and secure the bottle to a balcony railing, ceiling hook, or any stable overhead structure.
Make sure your bottle garden gets at least 6 to 8 hours of sunlight daily. Tomatoes are sun lovers — the more light, the better the fruit.
Step 5: Watering and Feeding
Tomatoes in hanging bottles dry out faster than in-ground plants, so check soil moisture daily. Water when the top inch feels dry.
Use a watering can with a narrow spout or a spray bottle to avoid flooding. You can also feed the plants every two weeks with organic liquid fertilizer or compost tea.
“To keep the roots cool and retain moisture, mulch the surface with coconut husk, dry leaves, or straw,” says urban gardener Leo Martínez. “It also helps suppress weeds, though you’ll have very few in bottles.”
Step 6: Give Them Support
Tomato vines love to climb. As they grow, gently tie them to the bottle or a nearby support with soft twine.
If fruits get heavy, provide extra support by hanging a secondary string beneath the cluster or resting it against a nearby wall or trellis. Trim yellow or dead leaves regularly to encourage better airflow and reduce the chance of fungal diseases.
Step 7: Help with Pollination and Protect from Pests
Tomatoes are self-pollinating, but giving the flowers a gentle shake helps spread pollen more efficiently, especially indoors.
On balconies or patios, you can also use a soft paintbrush to move pollen from one flower to another. Watch for pests like aphids, spider mites, or caterpillars. Use neem oil spray or insecticidal soap if needed — no harsh chemicals required.
Step 8: Harvest Time
Depending on the tomato variety and weather, your plants will produce fruit in about 60 to 80 days after planting.
Harvest tomatoes when they’re fully colored and slightly soft to the touch. Gently twist and pull — don’t yank. Picking regularly encourages the plant to keep producing.
You’ll be amazed how many tomatoes you can harvest from a few hanging bottles!
Why Use Plastic Bottles?
This method isn’t just convenient — it’s also eco-friendly and cost-effective.
✅ Saves Space – Vertical gardening is ideal for small living areas.
✅ Reduces Waste – Reuses bottles that would otherwise end up in landfills.
✅ Minimizes Pests – Being off the ground helps reduce insect and rodent damage.
✅ Improves Drainage – Hanging containers rarely suffer from root rot.
✅ Low Maintenance – No bending, digging, or tilling.
As eco-horticulturist Daniella Greer puts it, “Growing food doesn’t require a farm. A single bottle and a seed can feed your family if you give it sunlight, water, and care.”
Final Tips for Success
- Use cherry or grape tomato varieties for best results in containers.
- Rotate bottles occasionally to give all sides of the plant sunlight.
- Don’t overcrowd — one plant per bottle is enough.
- Clean bottles and change the soil between seasons to avoid disease build-up.
- Save seeds from your best fruits for next season.
Whether you’re a beginner or a city gardener looking for smart solutions, growing tomatoes in plastic hanging bottles is a fun, rewarding project. It’s sustainable, simple, and incredibly productive — often more than traditional pots.
So grab a few plastic bottles, some string, and start growing your hanging tomato garden today. Fresh, homegrown tomatoes are just a bottle away.