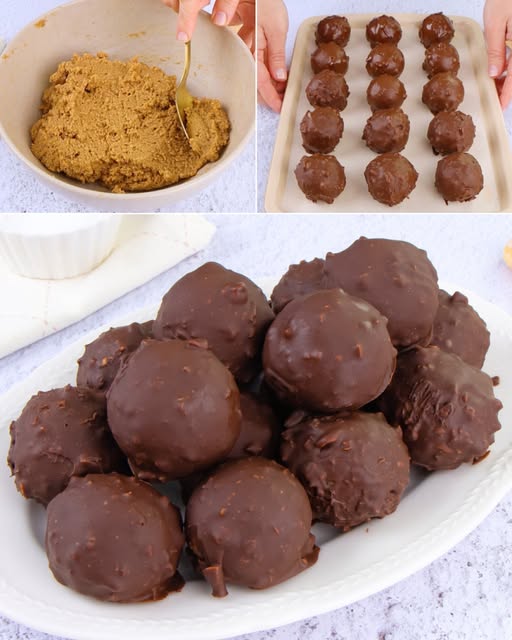
Craving something sweet, creamy, chocolatey—and dangerously easy to make? Meet your new favorite indulgence: no-bake chocolate tiramisu truffles. These bite-sized wonders combine the rich flavors of espresso-soaked ladyfingers, mascarpone cream, and smooth melted chocolate. They take all the best parts of tiramisu and wrap them into irresistible, pop-in-your-mouth delights.
Perfect for dessert trays, party platters, or those late-night cravings, these truffles require no oven time—just a few simple ingredients and a fridge. Let’s dive into the full recipe, along with tips, variations, and storage ideas to make these treats even better.
⭐ Ingredients (for about 20 truffles)
Here’s everything you’ll need:
- 260 g mascarpone cheese
- 220 g ladyfingers (savoiardi)
- 80 ml cold espresso coffee
- 70 g powdered sugar
- 100 g milk chocolate
- 40 g dark chocolate (optional)
- 30 ml seed oil (such as sunflower or canola)
- Bitter cocoa powder (for coating)
- Hazelnut grains or chopped nuts (optional, for decoration)
- Nutella or hazelnut cream (optional, for filling)
This blend of creamy, crunchy, and chocolatey ingredients hits all the right notes—classic Italian elegance with a modern no-bake twist.
👩🍳 Step-by-Step Preparation
1. Crush the Ladyfingers
Start by turning the ladyfingers into fine crumbs. You can use a food processor or go old-school: place them in a freezer bag and crush them with a rolling pin until they resemble coarse sand. The finer the crumbs, the smoother the dough.
Tip: The ladyfingers will absorb the coffee better if they’re finely ground.
2. Mix the Dough
In a large mixing bowl, combine:
- The crushed ladyfingers
- The powdered sugar
- Cold espresso
- Mascarpone cheese
Stir or mix with a spatula until the mixture becomes smooth and uniform. The texture should be soft but shapeable—slightly sticky is fine.
Optional: For added decadence, insert a small spoonful of hazelnut cream into the center of each truffle when shaping.
3. Shape the Truffles
Scoop out small portions of the dough (about 1 tablespoon each) and roll into balls between your palms. You should end up with around 20 truffles, depending on the size.
Place the truffles onto a lined tray or plate and refrigerate them for at least 30 minutes. This step firms them up for easier coating.
4. Prepare the Chocolate Coating
In a microwave-safe bowl or using a bain-marie, melt together:
- Milk chocolate
- Dark chocolate (for deeper flavor)
- Seed oil (adds shine and keeps the coating smooth)
Stir until glossy and lump-free.
Why add oil? It helps the chocolate stay fluid and creates a smoother coating that won’t crack as easily in the fridge.
5. Dip and Coat
Using a fork or skewer, dip each chilled truffle into the melted chocolate, turning gently to cover it completely. Let the excess drip off before placing the coated truffle back onto a lined tray.
6. Decorate
Before the coating sets, roll each truffle in bitter cocoa powder or sprinkle with hazelnut grains. This not only enhances the flavor and texture but also makes them look professionally finished.
Once all the truffles are coated and decorated, refrigerate again until the chocolate hardens—usually 15–20 minutes.
✅ Why You’ll Love These Truffles
- No oven needed: Perfect for summer or small kitchens.
- Customizable: Swap the filling, change the coating, or experiment with toppings.
- Elegant and indulgent: A crowd-pleaser for dinner parties, holidays, or romantic evenings.
- Tastes like tiramisu—but easier to make.
These are proof that you don’t need a complex dessert to wow your taste buds.
🍫 Tips & Variations
- Make it boozy: Add 1 tablespoon of coffee liqueur or rum to the dough for a grown-up twist.
- Try white chocolate: For a lighter version, coat with melted white chocolate and crushed almonds.
- Gluten-free version: Use gluten-free ladyfingers or biscuit alternatives.
- Vegan-friendly: Replace mascarpone with vegan cream cheese and choose dairy-free chocolate.
Want extra crunch? Add crushed wafers or a roasted hazelnut inside each truffle before rolling.
🧊 Storage Instructions
Store these truffles in an airtight container in the refrigerator. They’ll stay fresh and delicious for up to 5 days. For longer storage, freeze them for up to 1 month—just thaw for 15 minutes before serving.
Pro tip: Place wax paper between layers if stacking truffles in a container to prevent sticking.
📌 Summary Recipe Card
Ingredients:
- 260 g mascarpone
- 220 g ladyfingers
- 80 ml cold espresso
- 70 g powdered sugar
- 100 g milk chocolate
- 40 g dark chocolate
- 30 ml seed oil
- Cocoa powder, hazelnuts (optional)
Steps:
- Crush ladyfingers.
- Mix with mascarpone, coffee, and sugar.
- Form into balls, chill 30 min.
- Melt chocolates with oil.
- Dip truffles and coat.
- Decorate and chill until set.
Final Thoughts
These no-bake chocolate tiramisu truffles deliver all the flavor of a layered dessert in one heavenly bite. They’re simple to make, fun to customize, and rich enough to impress any guest—or just treat yourself.
So go ahead, raid your pantry, whip up a batch, and enjoy the magical union of chocolate and tiramisu—no baking required.


